Tinkerboard-S Setup
2019-12-28
I’ve got a couple Tinkerboard S SOC’s rolling around. I infrequently set a new one up, this is how it’s done.
getting an os image
The main distro you want is "TinkerOS".
If you google for "tinkeros download", you might be fooled into going to the original Tinkerboard downloads page, in which everything (at time of writing; 2019-12-27) 404’s when you try to download it. Worse, if you have the Tinkerboard S, that’s not the right page anyway. You instead have to go to a totally different page, go to "Driver & Utility", select "Others" for OS, and then finally get your build. It’s maddeningly sideways.
armbian is supposed to work on the Tinkerboard. And it’s a nice, mature project that some people swear by. Unfortunately, it never booted for me - the TB just sat with a solid red light. Didn’t matter if it was bionic or buster (the two options available at time of writing), it just doesn’t do anything. While i didn’t investigate all that fully, it seems to be a result of recent changes. I’d normally link a source to it being "a result of recent changes" here, but i’m writing this after-the-fact and can’t find the post.
flashing
The Tinkerboard S has an eMMC module with ~16gb of storage. When the board is plugged into a computer, without an sd card inserted, it ought to make itself available as a block device. Unfortunately, none of mine ever do this, on either Linux or Windows. This means you have to flash an sd card to "bootstrap" your tinkerboard - using the card only as long as it takes to ssh in, use the tinkerboard to flash its own eMMC, and then reboot from there.
Flashing follows the standard procedure of using either balenaEtcher or dd to copy to the block device of the sd card (unmounted). They both do effectively the same thing, though Balena does some sanity checking after the fact (like checking to see that the fs on the written device is actually valid), which can save time (even if it’s a bit ugly).
While I expect anyone reading this is already capable of figuring this out, a typical dd command looks like this; sudo dd if=./tinkeros.img of=/dev/mmcblk0 bs=1M. Where bs is "blocksize".
Note; don’t bother fucking around with trying to resize partitions in gparted or anything before using the device. Some distros do that on first boot anyway, and (if you intend to use eMMC) it’s entirely unnecessary.
After flashing the sd card, pop it into the device, plug in a network cable (more on wifi later, just use wired at first), forget the hdmi (you don’t need it), and then plug the power in (more on that later, too). Give it a few minutes (some distros resize partitions to fit the unallocated space of the device on first-boot).
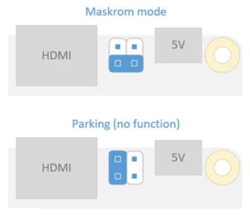
Make sure that the pins are in the appropriate mode (parking is noop, mask for booting from sd)
The solid red light indicates that the board is on, that should always be on. The blue light that flashes (color may vary) is the sd card access light, which is the surest sign that everything is going well so far.
After a few minutes, you should be able to find your DHCP reservation for your device (it advertises itself as tinkerboard), grab the ip, ssh in as linaro with password linaro, and have a full device ready to go.
eMMC
Since the board comes with built-in storage, at this point I tend to repeat the same flashing process from within the tinkerboard. wget (or curl, if you will) the latest tinkeros *.img file, use lsblk to find the block device for the eMMC (it shouldn’t be mounted, mine is always mmcblk0), then use dd to flash to the eMMC. After that’s done, a shutdown now, followed by removing the sd card, should get you to the point where you’re booting off onboard storage.
gpio/i2c setup
No matter which storage device you choose, after you flash you’ll have to do a couple extra things to give access to gpio for the linaro user (the default user).
#!/bin/bash

groupadd -f --system gpio
usermod -a -G gpio linaro

read -d '' rules << EOF
SUBSYSTEM=="gpio", KERNEL=="gpiochip*", ACTION=="add", PROGRAM="/bin/sh -c 'chown root:gpio /sys/class/gpio/export /sys/class/gpio/unexport ; chmod 220 /sys/class/gpio/export /sys/class/gpio/unexport'"
SUBSYSTEM=="gpio", KERNEL=="gpio*", ACTION=="add", PROGRAM="/bin/sh -c 'chown root:gpio /sys%p/active_low /sys%p/direction /sys%p/edge /sys%p/value ; chmod 660 /sys%p/active_low /sys%p/direction /sys%p/edge /sys%p/value'"
EOF

echo "${rules}" >> /etc/udev/rules.d/91-gpio.rules

groupadd -f --system i2c
usermod -a -G gpio linaro
echo 'KERNEL=="i2c-0"     , GROUP="i2c", MODE="0660"' >> /etc/udev/rules.d/92-i2c.rules
echo 'KERNEL=="i2c-[1-9]*", GROUP="i2c", MODE="0666"' >> /etc/udev/rules.d/92-i2c.rules
(this was taken from some post somewhere, but it’s been long enough that I forget from where).
wifi issues
TL;DR I never got wifi to work, and always use wired.
The chip naturally comes with wifi, but I wasn’t able to get it to work. Wifi isn’t something I’ve ever had a strong grasp on, when it comes to connecting solely via bash (especially considering the mess of various generations of network tools / wifi tools present on modern distros). The closest I ever got was following this post or that guide(not tinker specific), wherein the last command gave me a series of errors, and didn’t do anything.
root@tinkerboard:~# wpa_supplicant -B -Dwext -iwlan0 -c /etc/wpa_supplicant/wpa_supplicant.conf
Successfully initialized wpa_supplicant
ioctl[SIOCSIWAP]: Operation not permitted
ioctl[SIOCSIWENCODEEXT]: Invalid argument
ioctl[SIOCSIWENCODEEXT]: Invalid argument
You might just say "well that’s one guide" - trust me, I looked. Guides for the pi, general wpa setup, directly modifying /etc/network/interfaces, and the usual posts that come up when googling for tinkerboard wifi issues didn’t work either.
I don’t even know why i linked to all that, just know that it’s either so easy nobody except me has the issue, or it’s just got a quirk I couldn’t figure out.
a note on power
If you search around for anything related to the tinkerboard, you’ll find countless people going into depth about how microUSB is the wrong way to power the Tinker, and how both it and the pi suffer from performance drops due to being undervoltage. It’s even explicitly listed on the wikipedia page (or it was, at time of writing). This is absolutely true, these boards are sensitive to being undervoltage, and without a PSU (there isn’t one built-in) the boards have to throttle their performance significantly to preserve stability, when just plugged into the wall with an AC adapter.
The recommendation on how to do it right, however, is bunk. They’ll say to put power on three GPIO pins, which can properly power the device. This is great, but not only do you almost-certainly not have a three-pin power jumper to a power source on-hand, but it bypasses all the under-/over-voltage protections that exist with the microUSB power input on the board. So you run the real risk that voltage fluctuations destroy your device, rather than just shutting it down ungracefully.
The proper answer is that SOC’s need a PSU, but whatever, that’s not why anyone buys these.
